AVPro MXNet 10G
Ultra-low latency HDMI 2.0 4K60 4:4:4 video distribution featuring lossless audio, control signal distribution over 10G ethernet using SDVoE.
ShopUltra-low latency HDMI 2.0 4K60 4:4:4 video distribution featuring lossless audio, control signal distribution over 10G ethernet using SDVoE.
ShopNetgear AV XSM4340CV features 36 10G POE++ ports with 4 25G SFP ports.
Shop4K Turret Camera with excellent night vision and automation integration.
ShopElac Vertex 3 features a JET ribbon tweeter and Aluminum Crystal woofers to offers some of the best performance on the market in a compact design.
ShopThe Blackwire driver provides real world mixing controls on Control4 interfaces for the Yamaha MTX3 and MTX5D.
ShopThe On Sale section will be updated often with sale, clearance and end of life products. if you see products you are interested and would like to make a bulk purchase please reach out to our sales team for better pricing.
Complimentary setup on Just Add Power and AVPro MXNet systems before they ship. Save hours in the field!
A linear lighting design tool for Integrators.
IMPORTANT: This is not an app, these are graphical icons that you program.
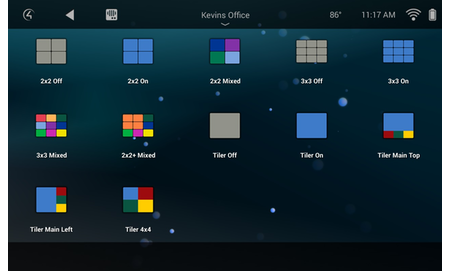
The Video Wall & Tiler Experience Icon Suite is designed for Composer 2.10+. The icons enable you to add video wall and tiler layouts onto the navigator interface. This experience icon contains 11 Video Wall icons and 5 tiler icons enabling you to enhance your customers UI experience with Control4 and these types of devices. With OS3 you can favorite these icons right to the home page of your navigator.
These icons are supported on all touch based Control4 interfaces:

The BlackWire VideoWall & Tiler Experience buttons are designed to give you easy to use icons on the T3 and mobile Control4 interfaces.
Each instance of this driver will create 1 single icon that you can assign on a touch screen
Once you have installed the driver enter the BlackWire License key and then assign the Mode.
Our recommended use is to have a few icons under watch and label them for the sources. Meaning You have a 2×2 lay out that says Video Wall ON. and a 2×2 version that uses the mixed icon to show that its now showing 4 different images. You can play around with what works best for your install and client.
Install multiple copies of the driver (paste the same license key into each). To do this you will select the mode first (Easy 2×2, 3×3, etc) This will make the driver populate property boxes for each of the available icons.
On the each copy of the driver click the drop down for each icon option IE 2×2 Off, 2×2 On, 2×2 multi, and hide all of them except for the one you want.
In the example below the icon you see is what you would have on the touch screen with 2×2 On set to show and 2×2 off and 2×2 multi set to Hide.

We need a few things to get this working.
The example to the right has the TerminalServer driver in each room. This driver is a TV driver as well so if you are doing CEC control there is no need to do custom programming against a normal tv driver.
Video Wall Button Programming:
To get started you will go to the Programming tab in composer. Click on the BlackWire Video Wall Icon on the left under Device Events and then click the Selected option.
You will send a command through each copy of the terminal services driver to each receiver. IE 4 tvs in a video wall means 4 copies of the driver.
Adding Your Programming:
Now that you understand how to send commands using the J+P Terminal Server driver you will use them in combination with standard composer room source selection.
This example would have DirecTV 1 being displayed stretched across all 4 displays
The BlackWire Video Wall Icon would be set to show 2×2 On
This example has each display watching a different DirecTV box and also the video wall being turned off.
Setting the video wall to all 1’s means that it is disabled.
The BlackWire Video Wall Icon would be set to show 2×2 Multi
Calling a button:
If you would like the buttons to track specific video wall modes you can have the buttons change their lay out mode. This is great if you want to attach this to when a tiler or video mode is called via programming or some other method so that your buttons track the lay out mode the displays are in.

This driver requires BlackWire Driver Manager to work.
Click here to register an account
Registration is easy and should only take a minute to fill out the form.