AVPro MXNet 10G
Ultra-low latency HDMI 2.0 4K60 4:4:4 video distribution featuring lossless audio, control signal distribution over 10G ethernet using SDVoE.
Shop
Guide Version: 5
Release Date 10/25/2023
Welcome to the Blackwire Ruckus Unleashed Setup & Best Practices version 5.0! This guide will walk you through the basic Ruckus Unleashed Best Practices, including System Setup, AP Setup, and creating 3x fully optimized WLANs to help you get the best possible design and performance out of your Unleashed Network.
Log into the Unleashed Dashboard using a Web Browser, https:// and the IP Address of your Master Access Point to get started.
Note: This is the second Guide in our Ruckus 101 series. You should have already completed the “Getting Started” guide before proceeding with this guide.
IMPORTANT NOTE: *Blackwire does not recommend using the Unleashed Mobile App, the Configure.Me SSID or other setup SSIDs, the “unleashed.ruckuswireless.com”, or the factory default IP address. Use a DHCP server to give the AP an IP address, scan the network, and use the Web HTTPS Based GUI for the best results.*
Some Important Notes:
Important: Blackwire currently recommends Unleashed firmware version 200.14.6.1.203 as the most stable current firmware. Please be sure to check the Blackwire Ruckus 101 main page regularly for the best-recommended firmware version.
Important: Turn off the wifi on your computer and plug directly into the network switch with an ethernet cable for the duration of this setup. As you configure the Unleashed System, there will be several interruptions to the WiFi Network. Attempting to use wifi can result in system errors and corrupt firmware images.
Follow the Instructions in Order!
*Note: It is highly recommended to complete this entire Best Practices setup, in this exact order, on a single AP, before adding additional APs, and before joining client devices. Joining client devices to a partially configured network can result in certain client devices blacklisting your network and refusing to join!
If you are replacing an older network, you will achieve the best results by deleting and re-adding the old SSID and password from your client devices, even if the SSID and password are exactly the same
All of the settings covered in Section I: Global Configurations will be found under the Admin & Services section of the Unleashed Web User Interface
Feb 1, 2023 Changes:
Leave the Country Code set in the default Optimize for Compatibility. If you would like to see the options click the button below which will open a new page.
Country Code Options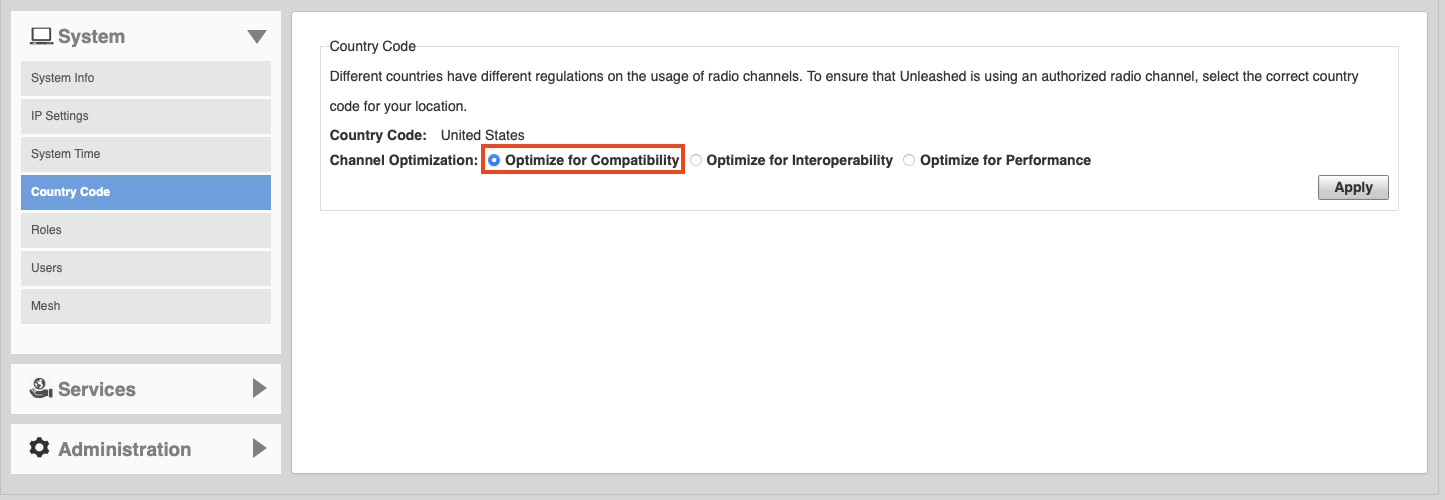
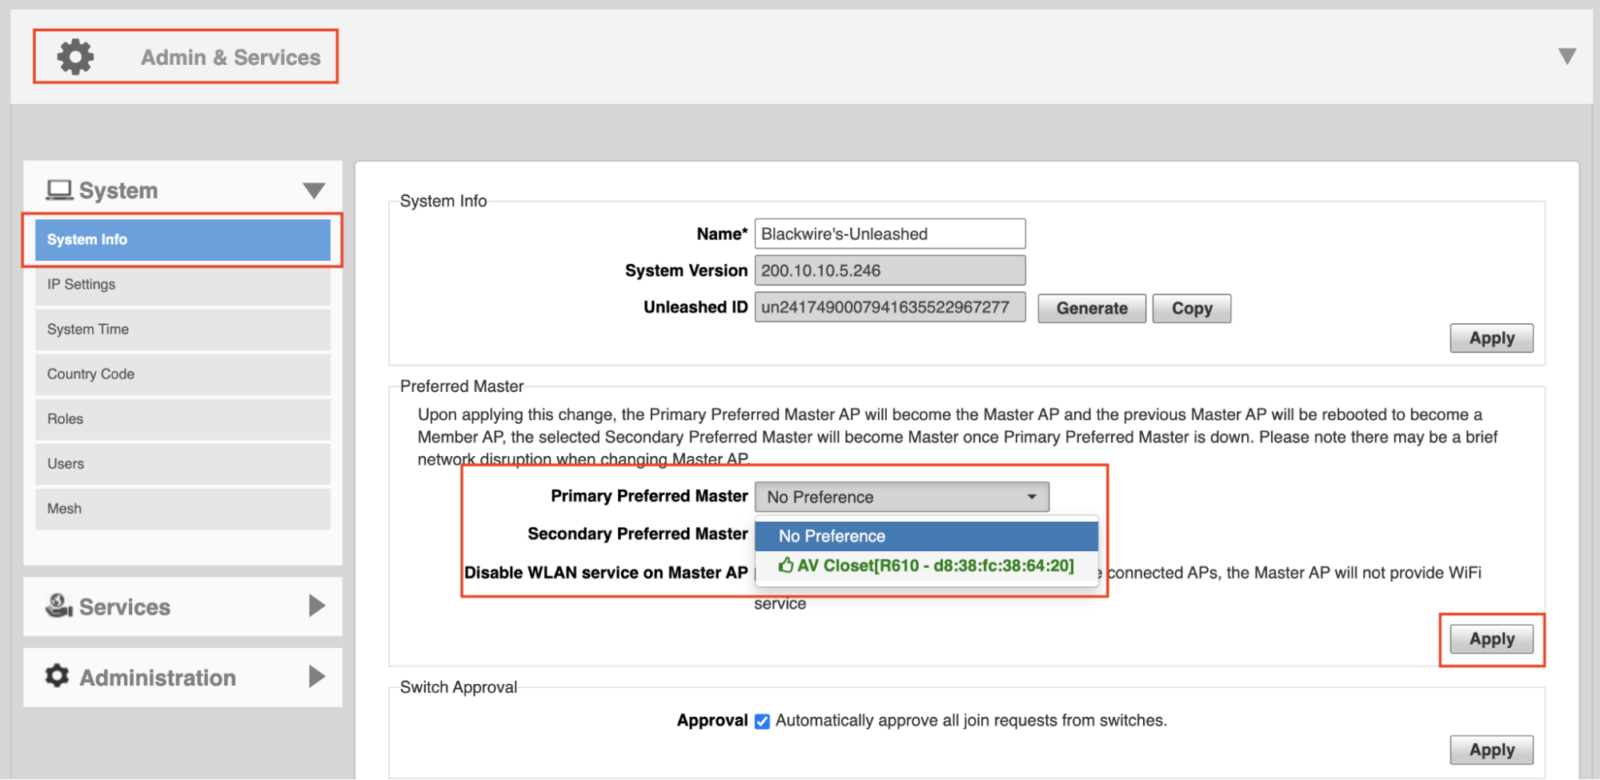
For the next few settings, navigate to Admin & Services > System > System Info
Name the System
If you want, change the name of your system here. We recommend just keeping “Ruckus” or “Unleashed” in the name so that it shows up on an IP Scanner, Domotz, or OVRC (if your local DNS setup is resolving local hostnames correctly)
Hit Apply to Continue

Preferred Master AP
Next, on this page, you can set a preferred Master AP. By default this will be the first AP you plug in, but if you need to change it later, this is where to do it. We already have an AP named “AP Closet” so we will set it to that. Naming AP’s is covered later in this guide.
The Best Practice is to set the Primary Preferred Master as an AP in a low traffic area, like the basement AV Closet, not the Living Room where there are many users and a high demand on the AP. The same principle applies to the Secondary Preferred Master. This is the next AP that will take over as the Master if the Master AP goes offline.
Hit Apply to continue
Switch Approval: Optional
Make sure that the Approval box is checked under the Switch Approval section if you would like any Ruckus ICX switch on the network to join the Unleashed Interface for statistics and some “lite” management functions
*Note: The Unleashed Interface is not a replacement for using the Command Line with a Ruckus Switch. You should still become proficient with Putty and the CLI

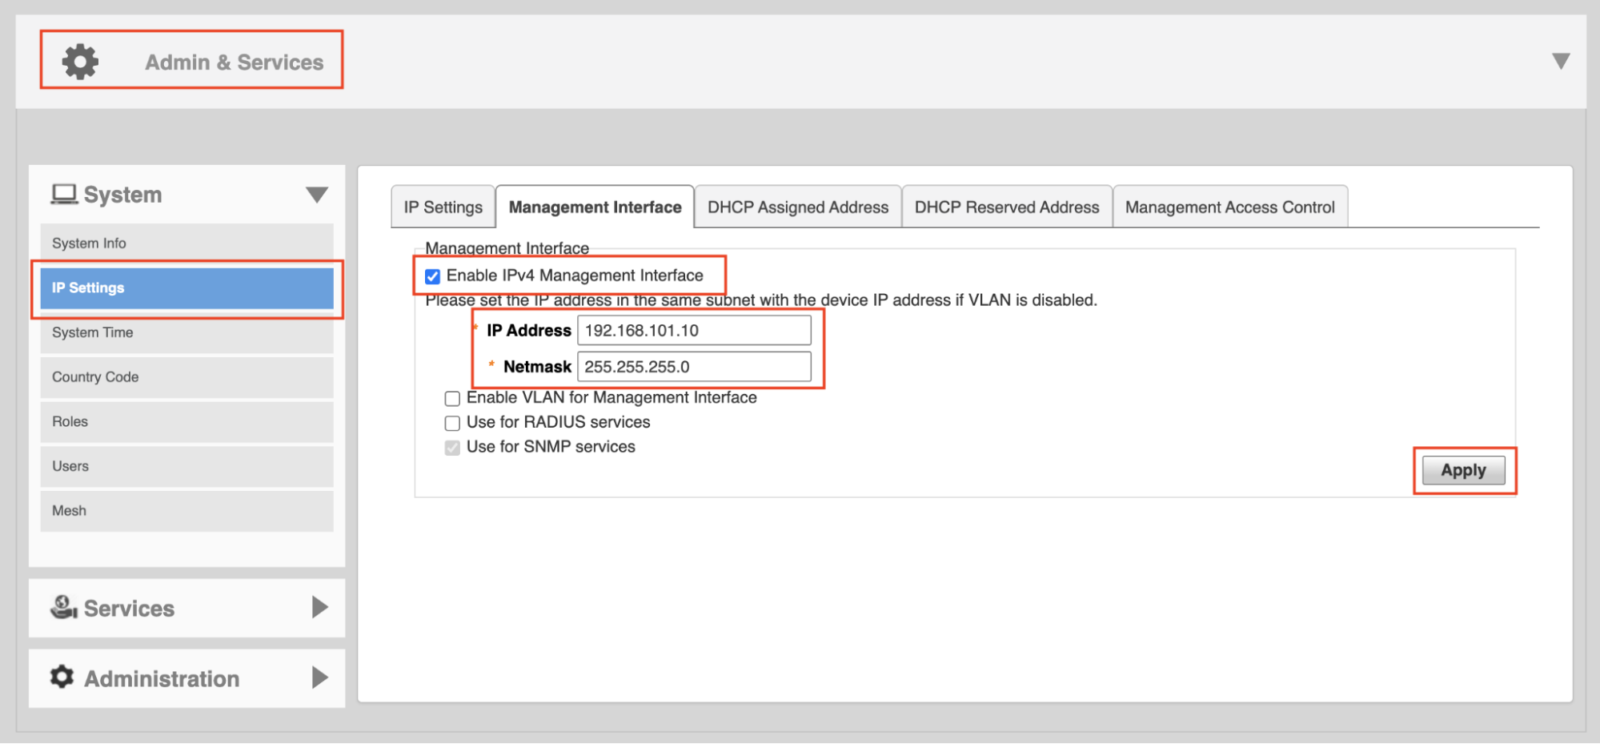
Feb 1, 2023 Update: We no longer recommend setting static IPs to each access point. Please leave them on DHCP. We do however recommend a Static IP assigned to the management interface.
Setting a Static IP for the Unleashed System. This is called the IPv4 Management Interface, and will always be the primary AP for logging into the entire system even if the Master AP goes offline.
Navigate to Admin & Services > IP Settings > Management Interface. We like to use a nice even number for this, in this example our Management Interface IP will be 192.168.101.10 with a subnet mask of 255.255.255.0. Check the box to Enable IPv4 Management Interface, type in your preferred IP address and the bitmask 255.255.255.0
Hit Apply to continue
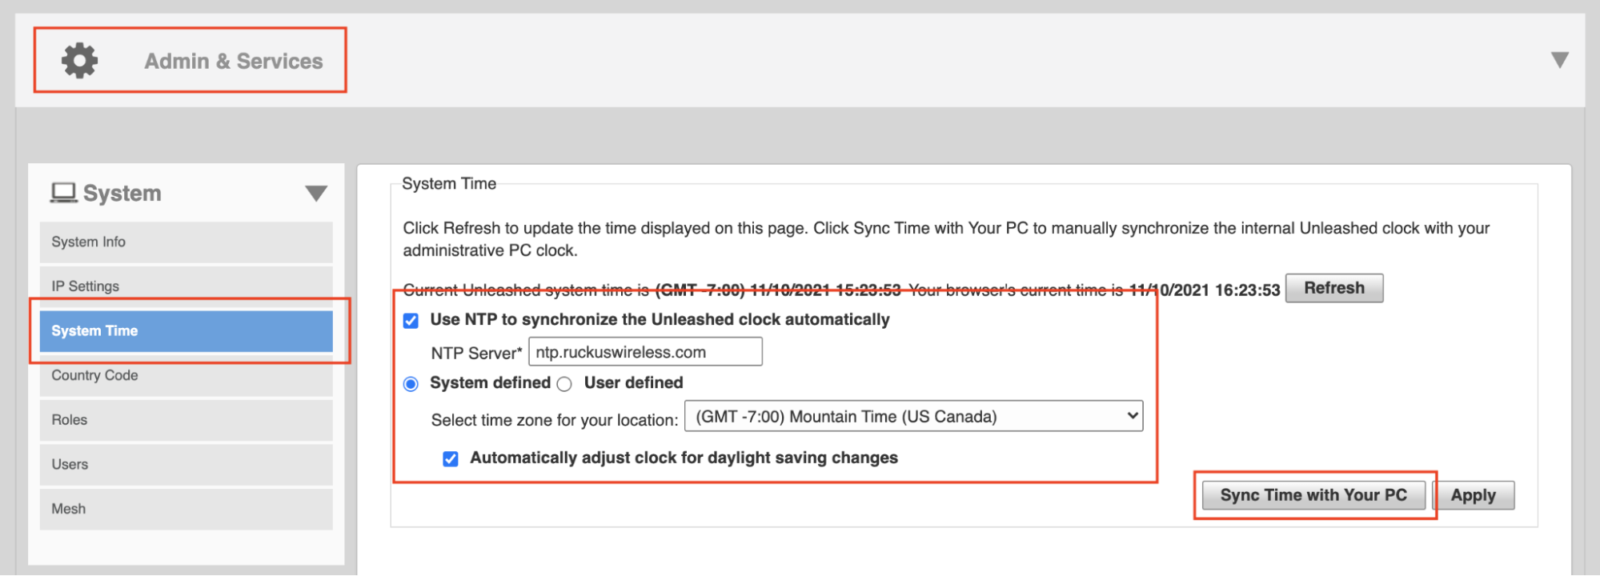
SYSTEM TIME:
The Unleashed System will automatically use the Ruckus NTP Server (Network Time Protocol) by default, but we need to tell the system which Time Zone we are in.
To select a Time Zone, go to Admin & Services > System > System Time > Select time zone for your location, and select your Time Zone.
You can choose whether or not to check the box to Automatically adjust clock for daylight savings changes based on whether or not your locality practices Daylight Savings Time. When you are done, hit Apply
To optimize Unleashed to automatically adjust the radio channels of your WiFi Network, go to Admin & Services > Services > Radio Control > Self Healing
Change the settings for Automatically adjust 5GHz channels to ChannelFly, then hit Apply
Note: In a Residential Network, the neighborhood radio environment is always changing. Unless you have a very good reason to set static channels, you should always let Ruckus choose your channels for you. Remember to only use channels 1, 6, and 11 for the 2.4 GHz spectrum in all of your networks.

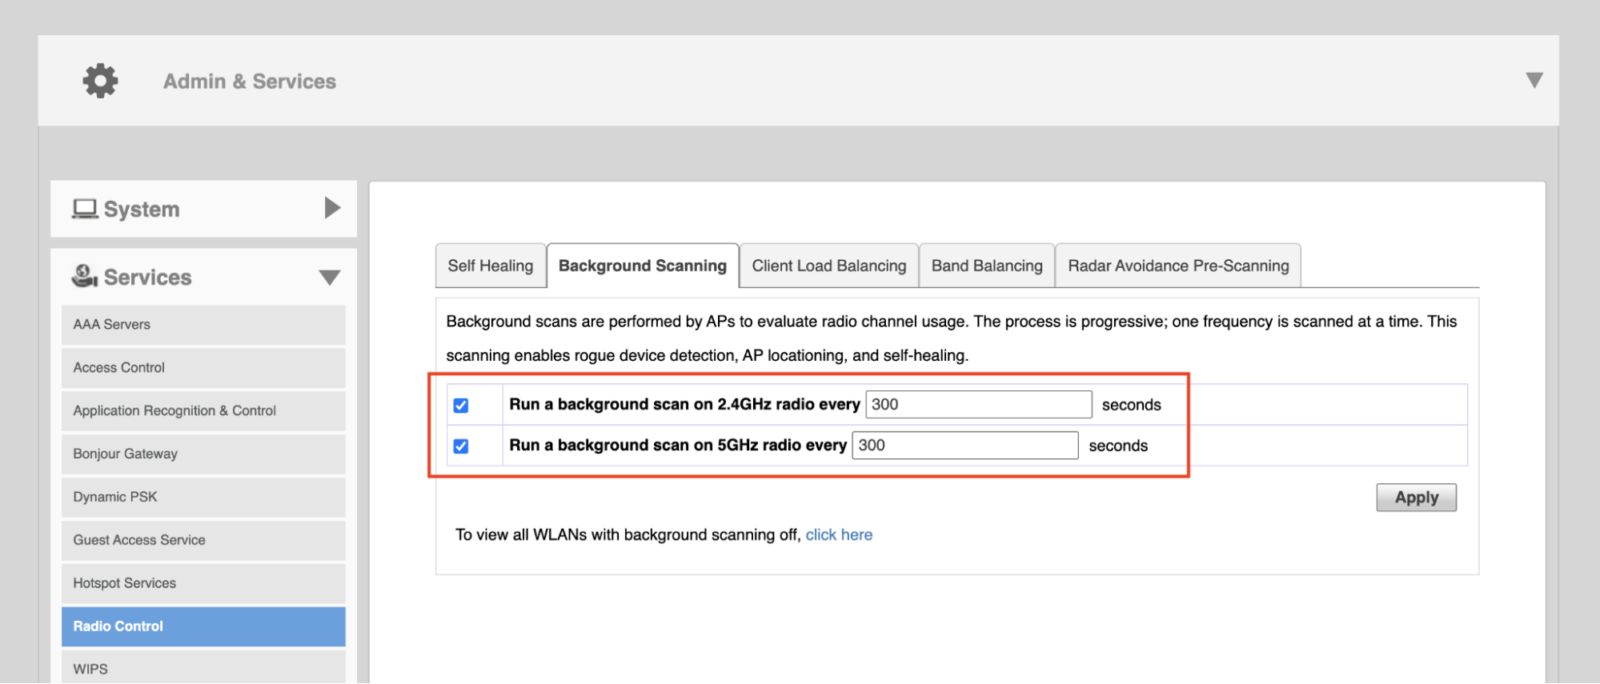
Before leaving the Radio Control menu, select the tab for Background Scanning. Change the settings for “Run a background scan every…” to 300 Seconds and hit Apply.
This will increase the performance of your WiFi Networks by reducing the resources devoted to scanning the radio environment, decreasing overall Network Overhead, and stabilizing your channel selection so that devices stay connected for longer periods of time. This is a good setting for most sites and can be considered a “best practice”
*Note: If your site is in an overpopulated radio environment, ie New York City, you might want to set this to a lower interval like 20 or 60 seconds. If your site is in a Rural area, ie. you are a long way from any neighbors or any other wifi networks, you can set this to something longer, ie. 3600 seconds.
This Concludes the Section 1: Global Configurations section. Go back to the top and click the 2. Setting UP WLANs tab
Blackwire recommends 3 standard WLANs, and we will show you how to set these WLANs up, step by step:
Note: If all client devices were the same, this would be easy! But they aren’t, so it’s not. These 3x WLANs will cover 95% of use cases but not 100%, this is not unique to Ruckus, this is true of any enterprise WiFi system.
Follow the instructions first, update your client device software and firmware, delete and re-add the SSID in the client device, and if you are still having issues with a specific device not cooperating, call us.
To get started on creating the Blackwire Standard 3x Recommended WLANs, we will take a brief detour to the Access Points panel in the Unleashed Interface to disable unnecessary 2.4 GHz radio channels.
Navigate to Access Points > Select the “Group View” Icon > System Default > Edit

Under Radio (2.4G) de-select every channel except for 1, 6, and 11. Your 2.4 radio settings should look like this before you click Finish
*Note: You MUST change the Country Code before you do this, changing the Country Code after resets all of your channels. See Section I for Country Code settings and instructions*

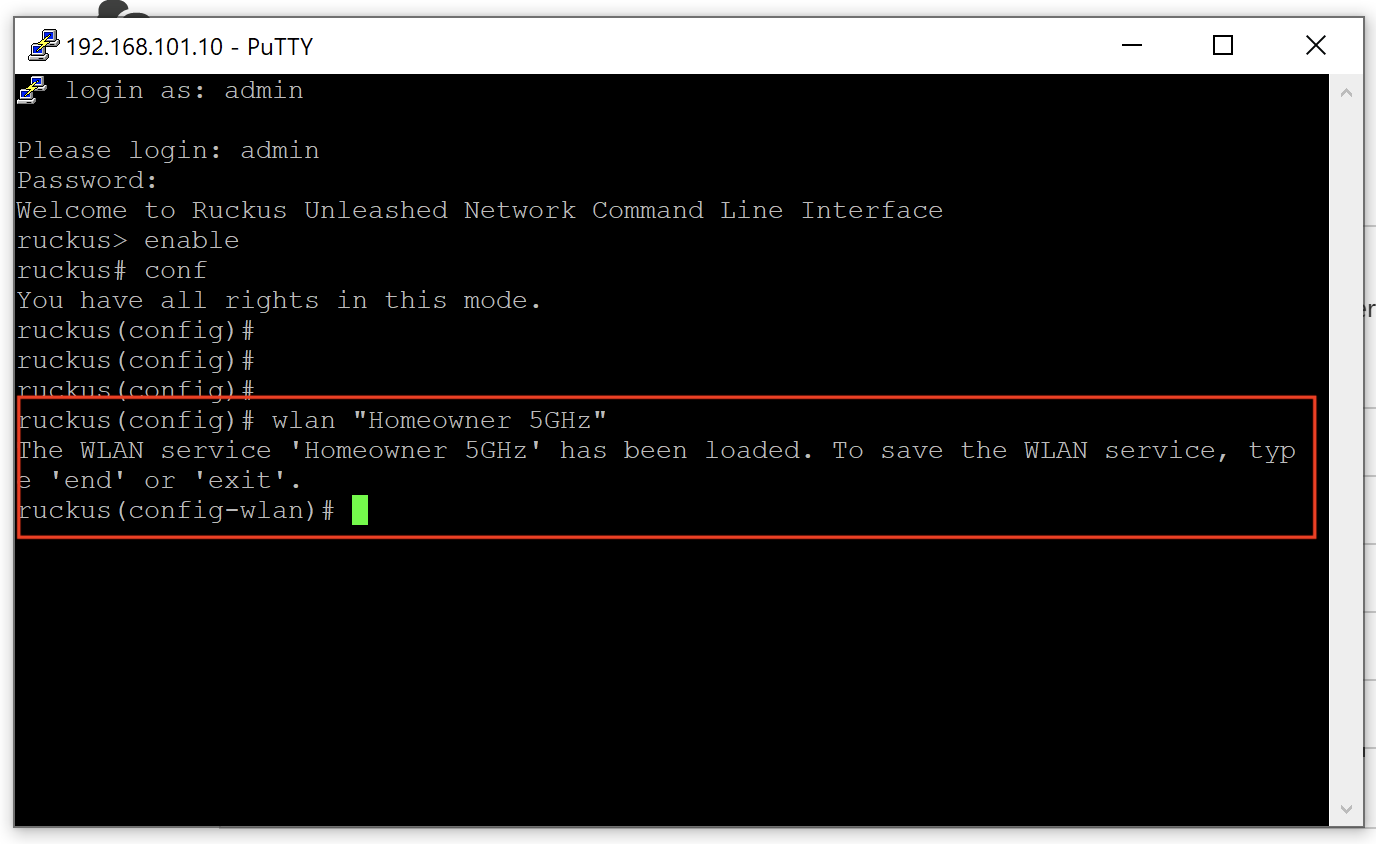
Now, let’s set up the primary Homeowner 5GHz WiFi network.
When you went through the initial setup wizard, you created a WiFi network. By default, this network will have both 2.4 and 5 GHz radios enabled. For this example, our wifi network will be called “Homeowner 5GHz” for clarity, but you can choose any name you like.
Navigate to WiFi Networks > Select the First and Only Network > Click Edit

The main panel for this WLAN should look like this. Name the network whatever you want, we recommend putting 5GHz in the title to help users other than yourself understand that this is the 5GHz network.
If you only have devices made in the last year or two, you can use WPA2/WPA3 mixed, but if you have a device that is a few years older, or if you are in doubt, just use WPA2 as your Encryption Method


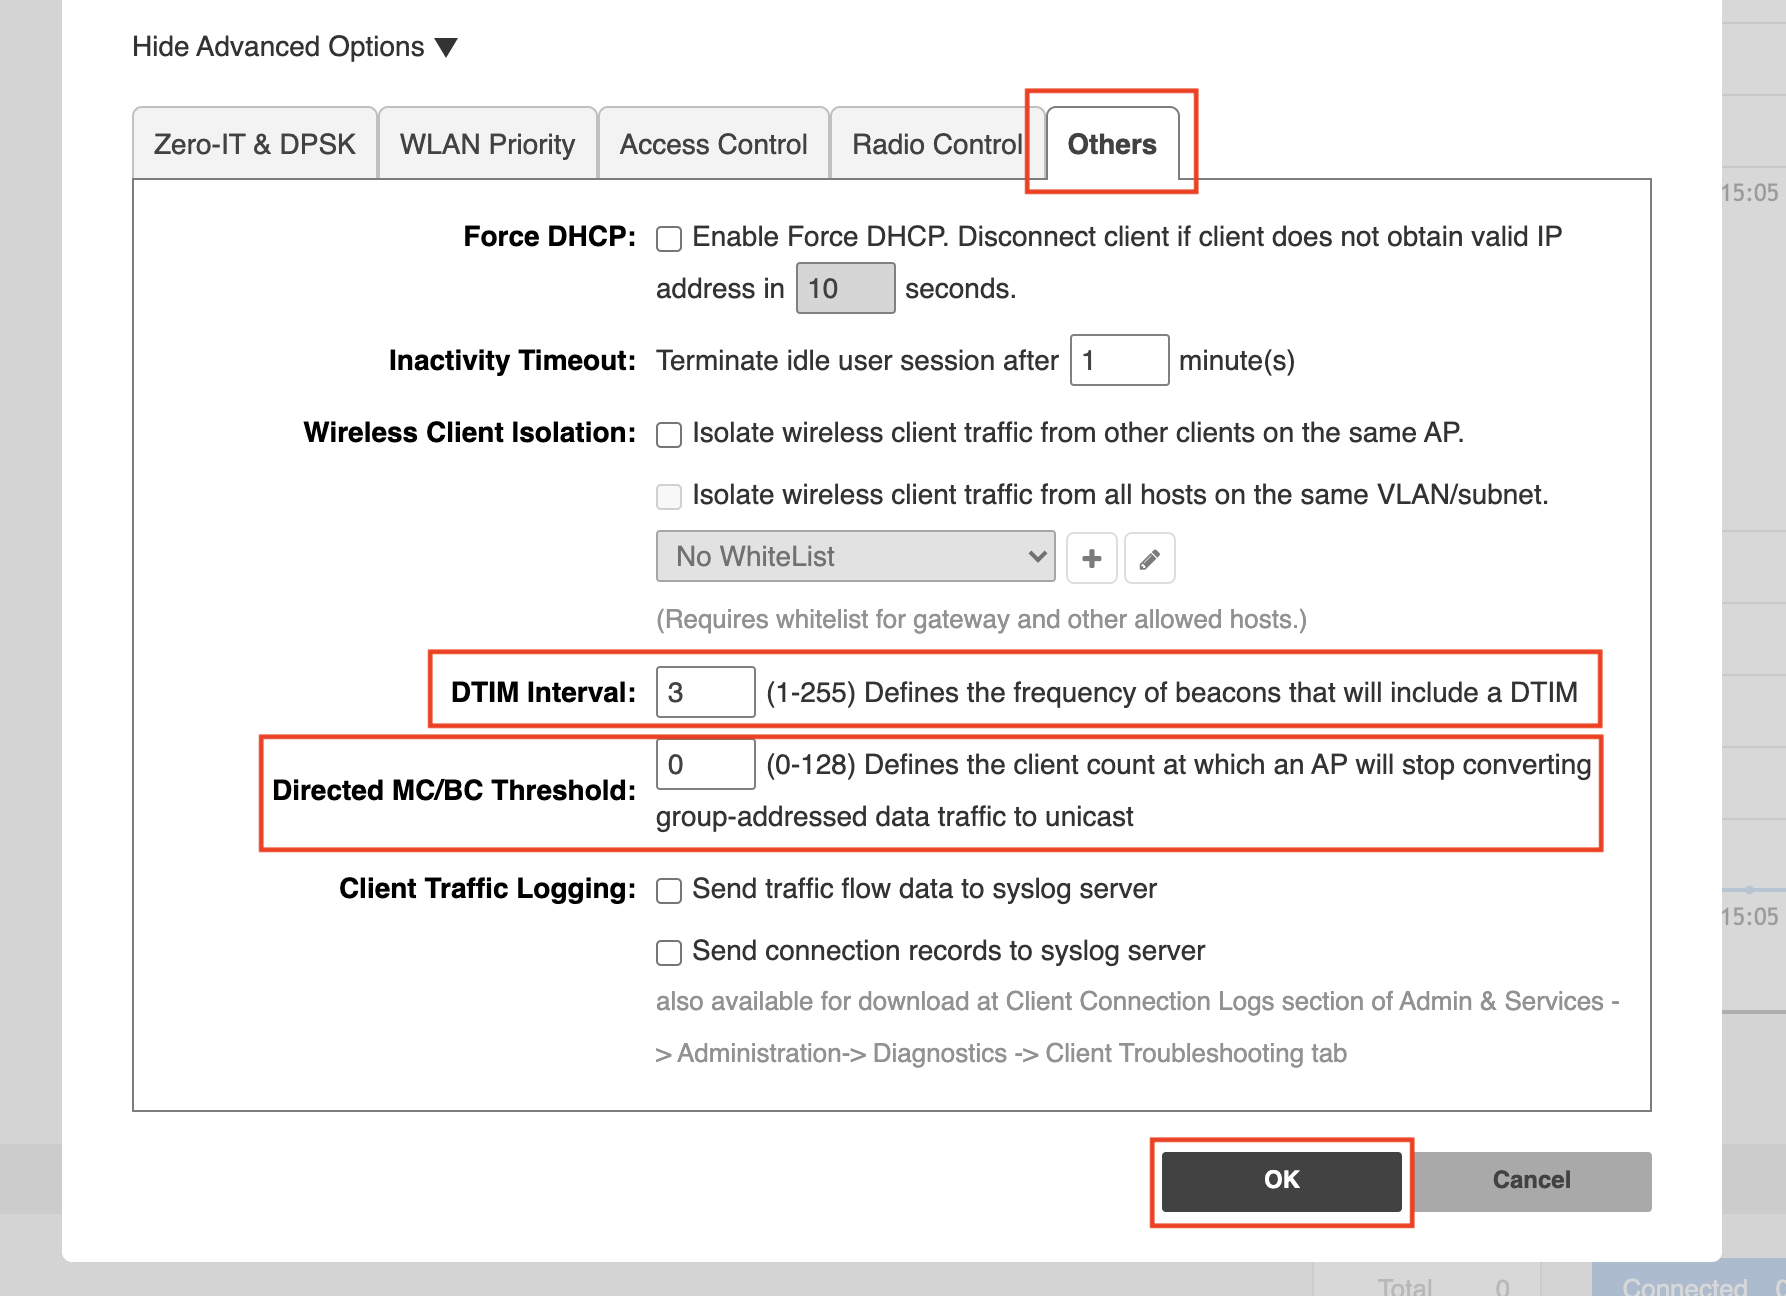
Next, select the Others tab. There are some VERY important settings here. Set the DTIM Interval to 3. This will help preserve battery life on sleeping devices by reducing the frequency of beacons sent to wake them up.
Next, set the Directed MC/BC Threshold to 0. This is the secret sauce to making Ruckus work with IoT, such as Sonos, Lutron, Ring, Chime, Printers, and many other devices that require directed multicast to be disabled. If this is not done, systems such as Sonos will have their multicast traffic converted to unicast, and you will not be able to join or communicate with these types of very common systems.
Hit OK to finalize the Homeowner 5GHZ WLAN
IOT 2.4 GHZ WLAN
Next, let’s create our IoT 2.4GHz WiFi Network. On the WiFi Networks page, hit Create

IOT WLAN MAIN PANEL
This page will look exactly like it did on the 5GHz network, give it a different name. We recommend putting 2.4GHz in the name so that users other than yourself understand that this is a 2.4 GHz network for control systems and IoT devices; not their phones and personal devices. ALWAYS set a password for your network.
Expand the Show Advanced Options to continue

The Advanced Options settings will be the same as before, except this time under Radio Control > Enable WLAN on > 2.4 GHz Only. Don’t hit OK yet

IOT ADVANCED > OTHERS
Next, select the Others tab. Again, set the DTIM Interval to 3. Set the Directed MC/BC Threshold to 0. Hit OK to finalize your IoT 2.4 GHz WLAN.
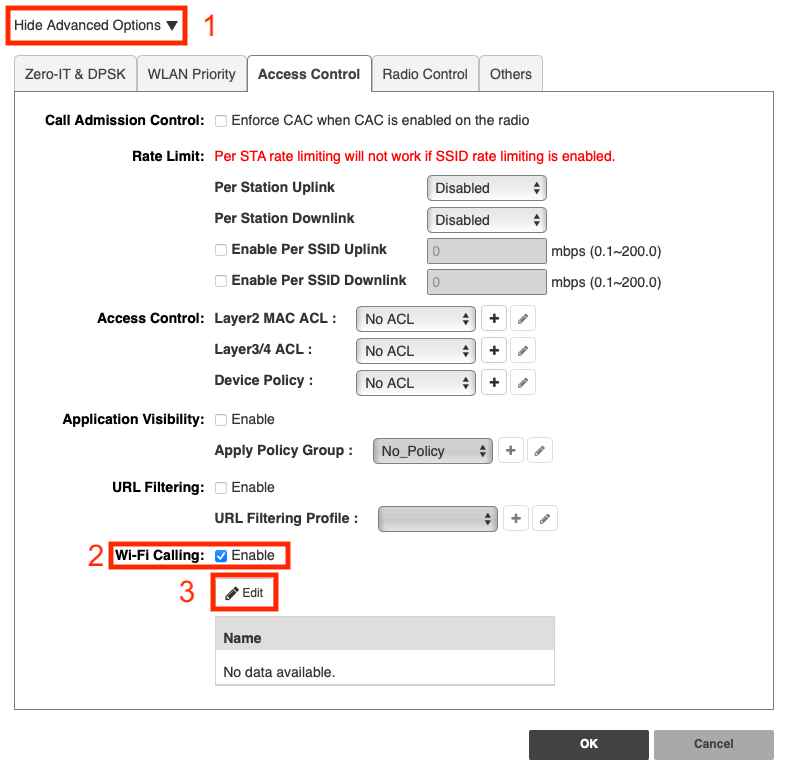
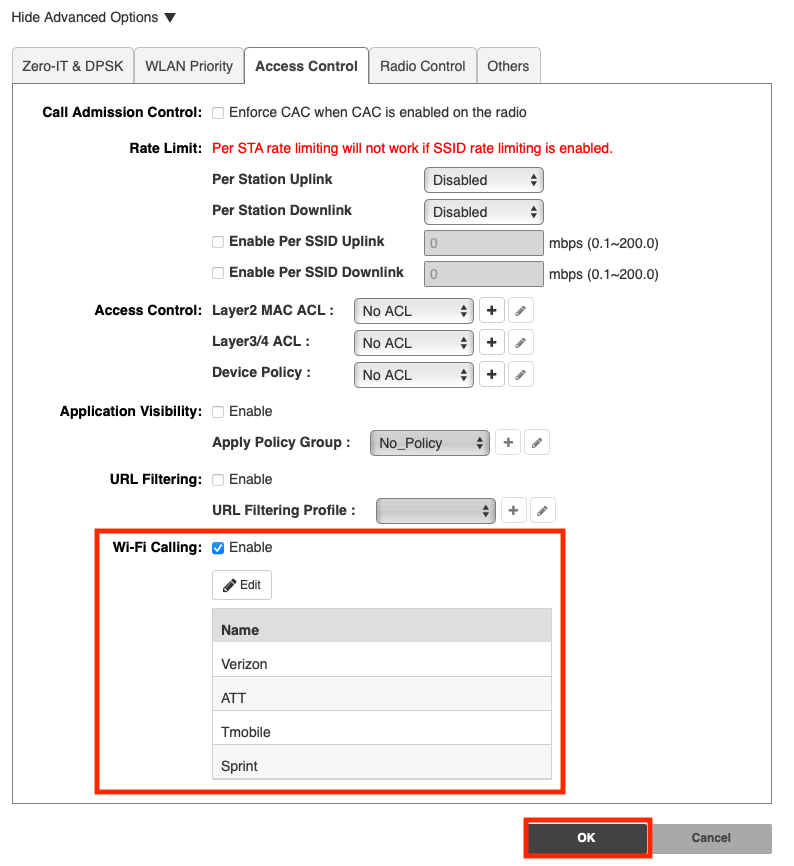
Note: DO NOT set up wifi calling on this network, you need those network resources and airtime saved for the Homeowner 5GHz network!
IOT WLAN QR CODE
If the Unleashed Interface asks if you want to Save or Print the QR code for the wifi network… sure! You could print it out, put it in a little gold picture frame on a hallway table, your customers will be impressed
YOU ARE FINISHED WITH THE IOT 2.4 GHZ WLAN!
Now, if you don’t need a Guest Network, you can skip ahead to the next full Section III – Access Point Settings.
GUEST WLAN
To create a Guest Network, from the WiFi Networks page, hit Create

GUEST WLAN
There will be more settings to pay attention to on this page than before:
Expand the Show Advanced Options tab
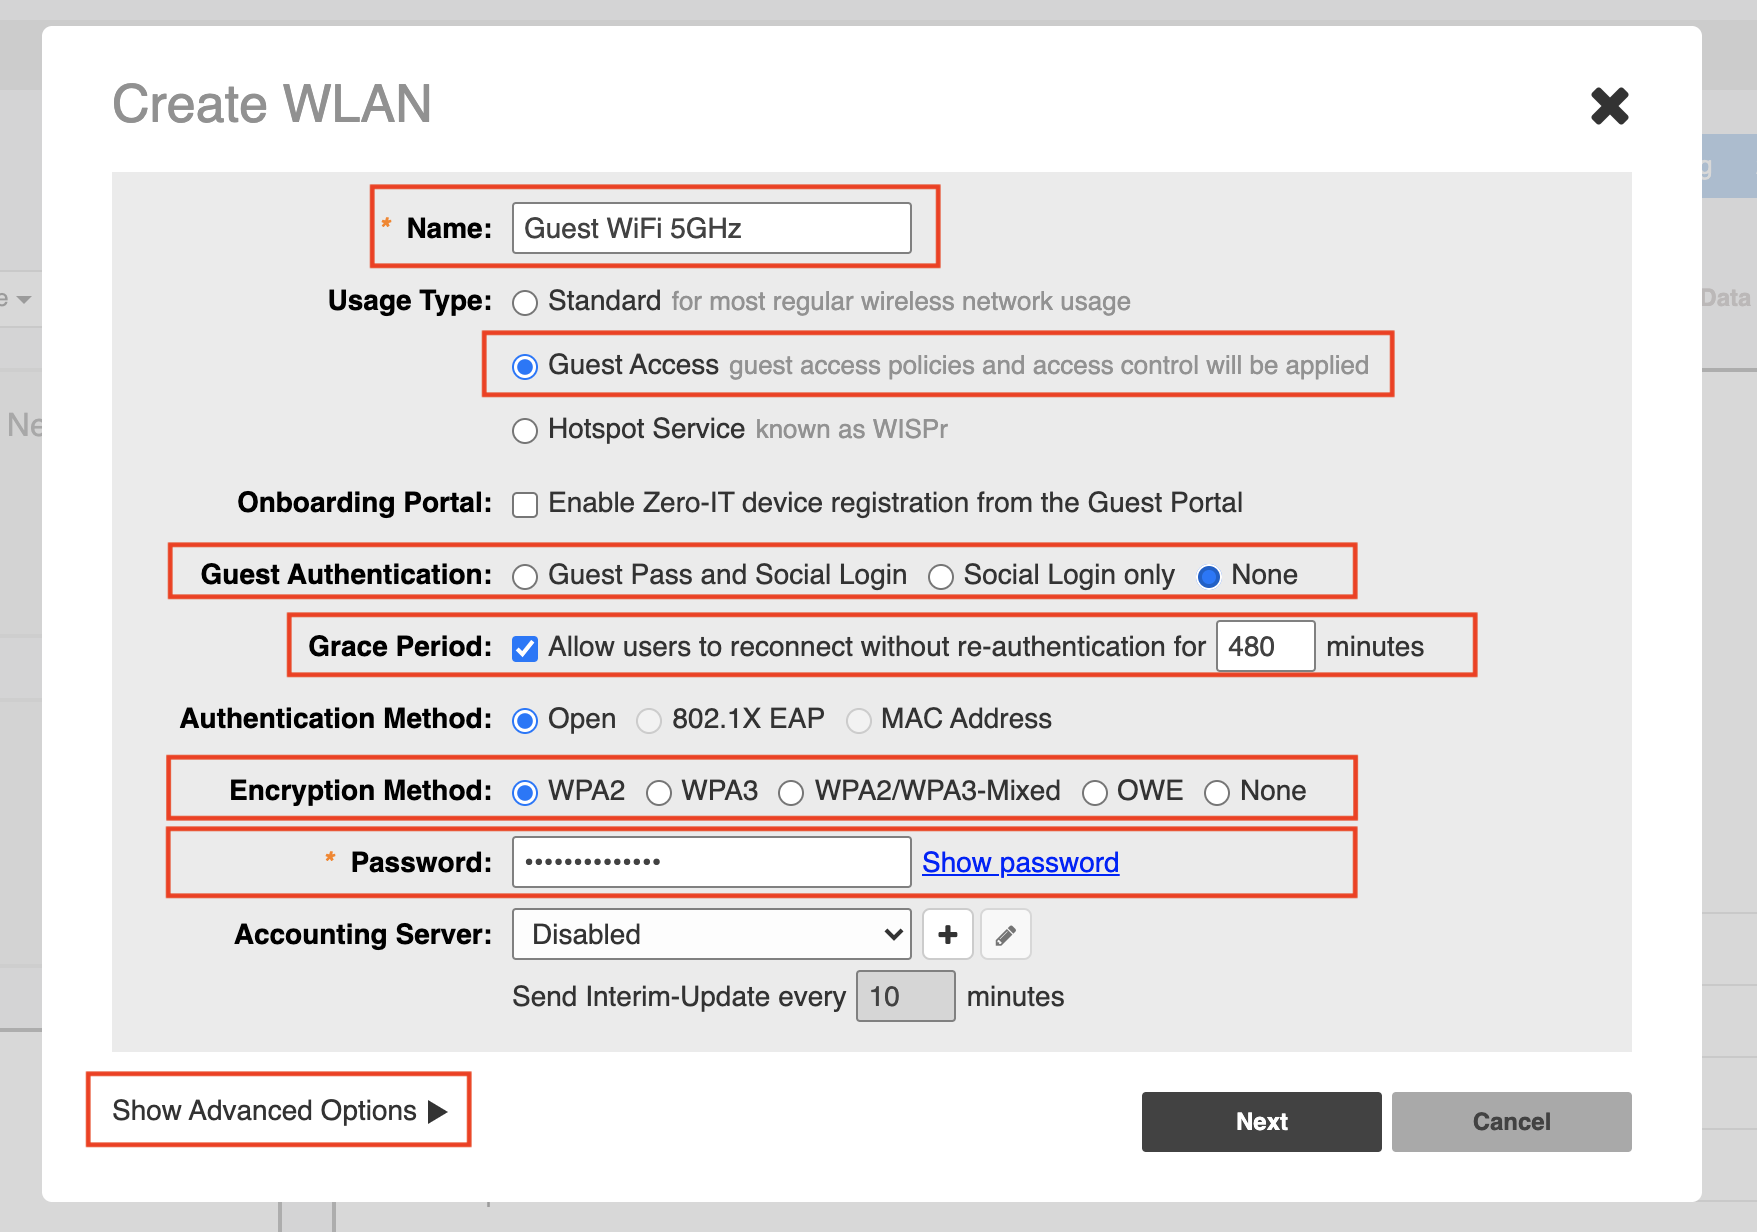
GUEST WLAN
Under Advanced Options > Radio Control > Enable WLAN on set the Guest WiFi 5GHz to 5 GHz only
Note: This is our recommended setting to keep your radio environment as clear as possible by using 5 GHz channels, however, if this WLAN needs to extend further through your site, you may want to use 2.4 GHz or both 2.4 and 5 GHz.
If you need WiFi Calling on your Guest Network, it will work better on 5 GHz only.

GUEST WLAN
On the Others tab, set the DTIM interval to 3 again, but this time, leave the Directed MC/BC Threshold set to 1 to preserve network resources. Users on the Guest Network are not supposed to talk to Sonos anyways.
*Note: You will notice that under Wireless Client Isolation the box is checked for “Isolate wireless clients”, guaranteeing that clients on the Guest Network have complete network isolation from everything except Internet Access.

GUEST WLAN
When you hit Next, you will see this page pop up. This is the page for Captive Portal settings. A “Captive Portal” is that pop up screen you see when you join a network at Whole Foods. Usually in a residential network, we don’t want this, so you can uncheck the Enable box next to Captive Portal.

CAPTIVE PORTAL
After disabling the Captive Portal, you can hit the OK button.

FINISHED 3x WLANS
Congratulations!!! You have just designed 3 wonderfully optimized WLANs for your customers on a top of the line Ruckus Network!
There are some remaining settings for Access Points, continue to Section III: Access Point Settings when you are finished.

*Note: Adding each additional SSID adds a LOT of network overhead, so if you don’t really need it, don’t add it. Or… add it but disable it for later, we will show you how
This Concludes the Section 2: Setting Up WLANs section. Go back to the top section and click the 3. Access Points Settings tab.
If you have finished Section I and Section II, you can now add APs to your system! It is still best to finish Section III and Section IV of this guide before you start joining devices to your network.
If your AP’s are on the correct firmware, and they are in a factory default state, all you need to do is plug them into the network on the same subnet with a DHCP server and wait a few minutes. They will join and adopt the existing configuration automatically!
Section III focuses on Master and Member Access Point Settings, every setting in this section will be under the Access Points menu on the main Unleashed UI page
It is important to name your AP’s and give them a description and location for organization, setup, statistics, and troubleshooting purposes. Pro tip: write down the last 4 of the MAC addresses before you install them in place
To name your AP’s, navigate to Access Points, select an AP, and hit the Edit button. Under the General tab, we can give our device a Name, a Description, and a Location.

We recommend keeping the Name and Description the exact same, as this info will appear in other sections of the Unleashed Interface.

Blackwire is not recommending setting a Static IP on your Access Points, however, in the event that you do want to set Static IP’s on your Access Points we have the instructions listed below. We are only recommending using a Static IP for the management interface for easy access.
Note: You can not change the IP Address of the Master Access Point from the Access Points section of the Unleashed Interface. To change the IP Address of your Master Access Point, go to Admin & Services > IP Settings > IP Settings
To set a Static IP for the other Access Points, go to Access Points, select the AP that you want to change, and click Edit:
In the Edit AP pop-up, go to Network, select Manual, and enter an IP Address, Netmask, Gateway, and set your Primary and Secondary DNS Servers. Again, if you are not a DNS wizard, use the address of your router as the primary, and 8.8.8.8 for Google’s public DNS server as your secondary
Hit OK. The Access Point will disconnect and reboot with its new Static IP

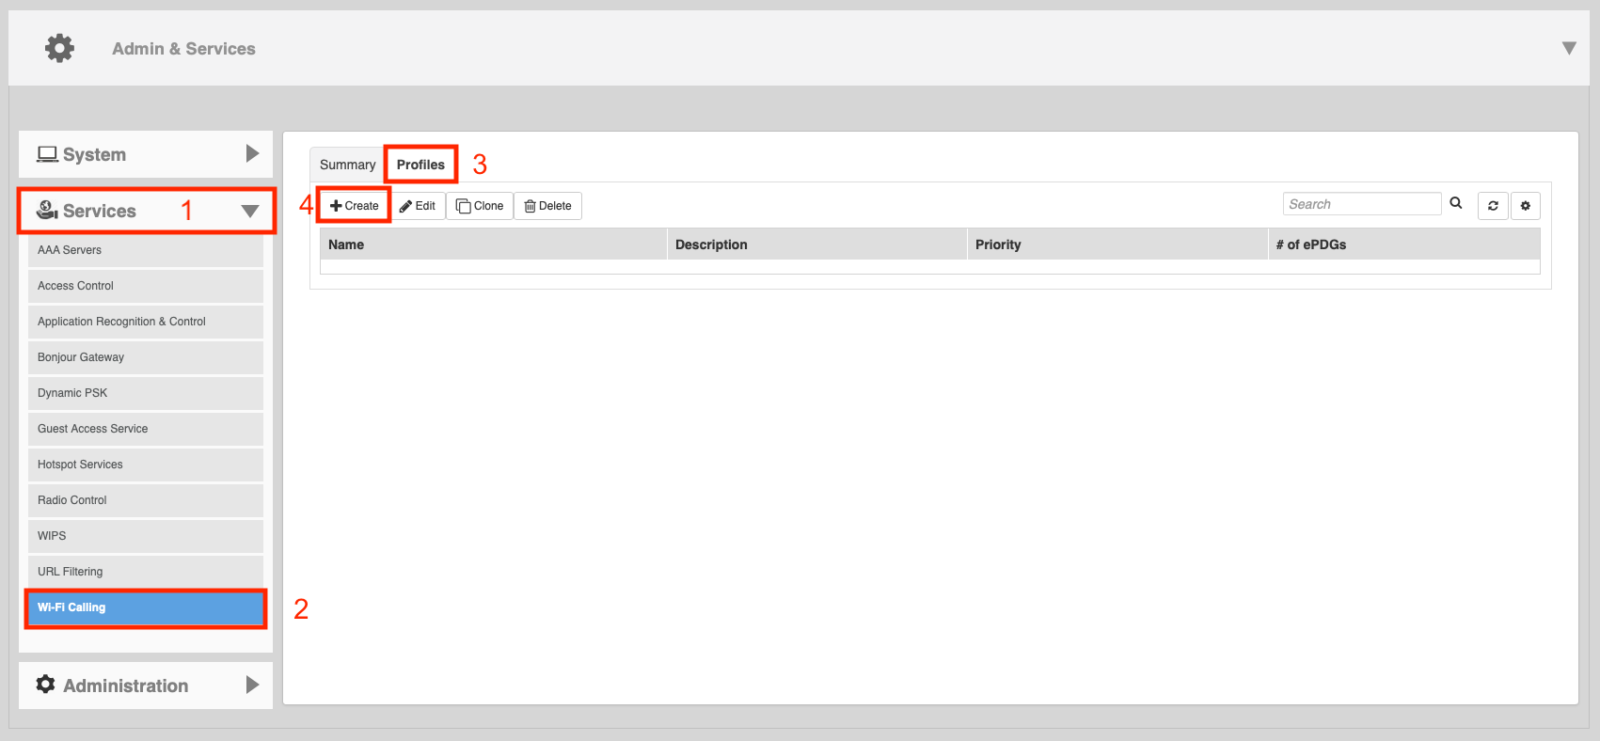
This Concludes the Section 3: Access Point Settings section. Go back to the top and click the 4. WIFI Calling tab.
The settings on this page do not make Wifi calling work or not work. They simply provide enhanced capabilities.
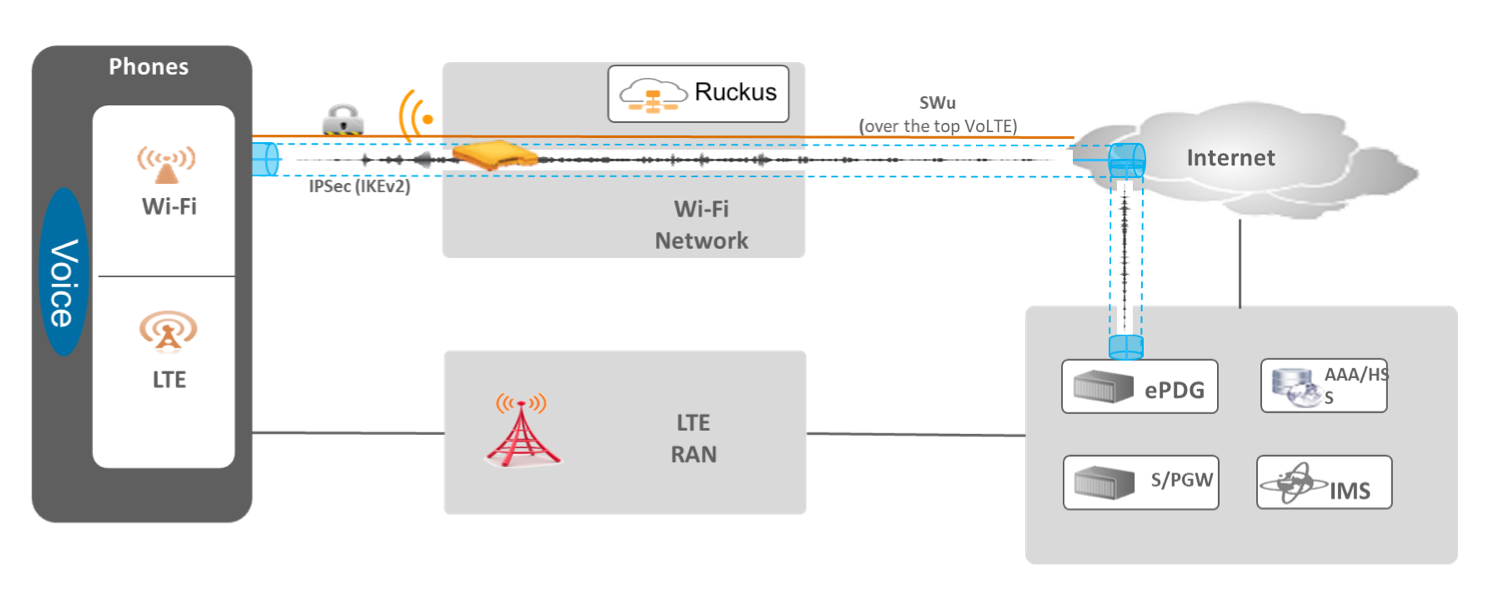
Ruckus W-Fi calling creates an ecosystem for Voice that is not only best-in-class in service and reliability but is also on the leading edge of the Voice over Wi-Fi standard.
In a normal Wi-Fi calling scenario, the client device connects to the local WLAN and a call is established, usually without any issues. However, when that device leaves the WiFi Network and attempts to transition to the LTE Cellular Network, the call is dropped. This is due to the lack of visibility of the carrier system to the client traffic before the device establishes a cellular LTE link.
Ruckus provides the ability to identify a Voice Wi-Fi call through Ruckus QOS and establish a tunneled connection to the local carrier’s Packet Data Gateway. These settings allow a client device to successfully roam from the Wi-Fi network, to a cellular LTE connection, during a WiFi Calling session, without any drops or interruptions.
The Data flow can be seen in the two Network Diagrams below. The connectivity to the carrier is maintained just as it is in standard LTE networks by using the Ruckus Wi-Fi calling feature enabled on any WLAN deployed on a Ruckus Unleashed system.
Warning: WiFi Calling also may require certain settings on your device for certain carriers and localities, do not forget to enable WiFi Calling on the device itself and double-check any other settings that will allow your device to call successfully.
Also, if your Firewall or Router has settings such as “Preserve IKE Port” or “IPSec Passthrough”, make sure that these are enabled, that you understand these settings, and have researched the best WiFi Calling settings for your Firewall Router.
Finally, make sure you do not have a Double NAT setup: ie. your router plugged into another ISP modem/router that is also routing; use bridge mode whenever possible to disable routing on the modem.
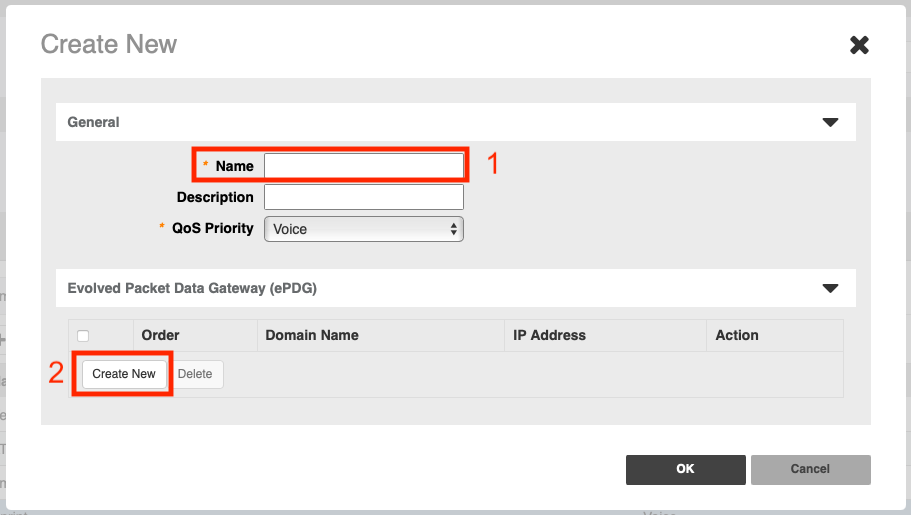
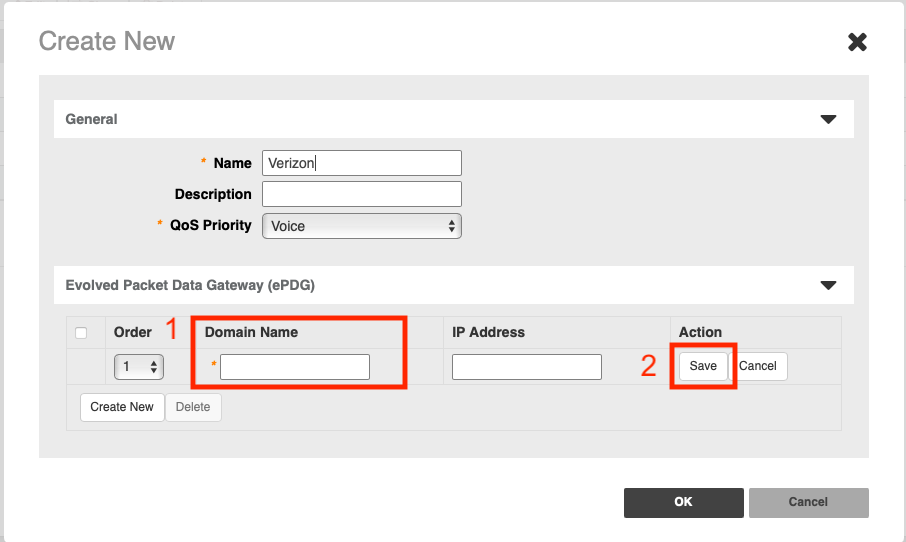
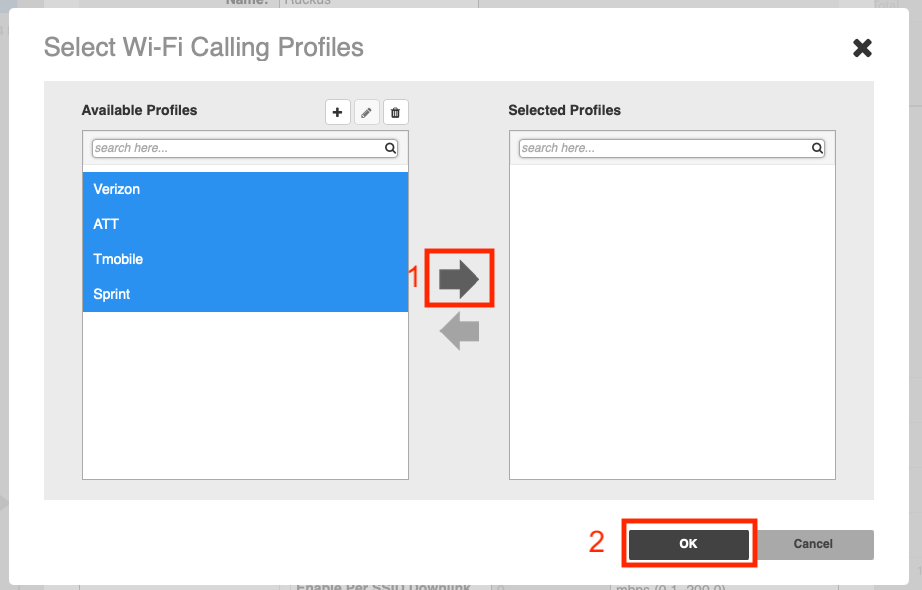
1. Add the carrier Domain Name
2. Click on Save
NOTE: some carriers use multiple Domain Names. You must press save and then the create new button again to add multiple lines. We recommend using all profiles as some carriers use other radio towers to carry their service.
Verizon:
wo.vzwwo.com
ATT:
epdg.epc.att.net
Sprint:
primgw.vowifi2.spcsdns.net
TMobile:
epdg.epc.mnc260.mcc310.pub.3gppnetwork.orgss.epdg.epc.mnc260.mcc310.pub.3gppnetwork.orgss.epdg.epc.geo.mnc260.mcc310.pub.3gppnetwork.org
When you are finished you will see a page like this listing all of the profiles you have added.
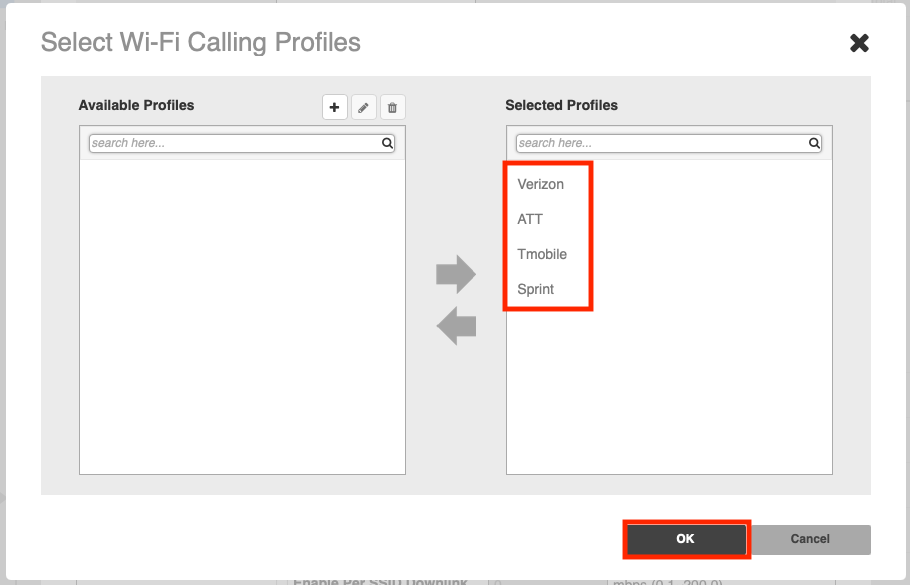
Now exit out of the Admin & Services area and go to the Wifi Networks section and click on your Wifi network and then click Edit to edit the WLAN settings.
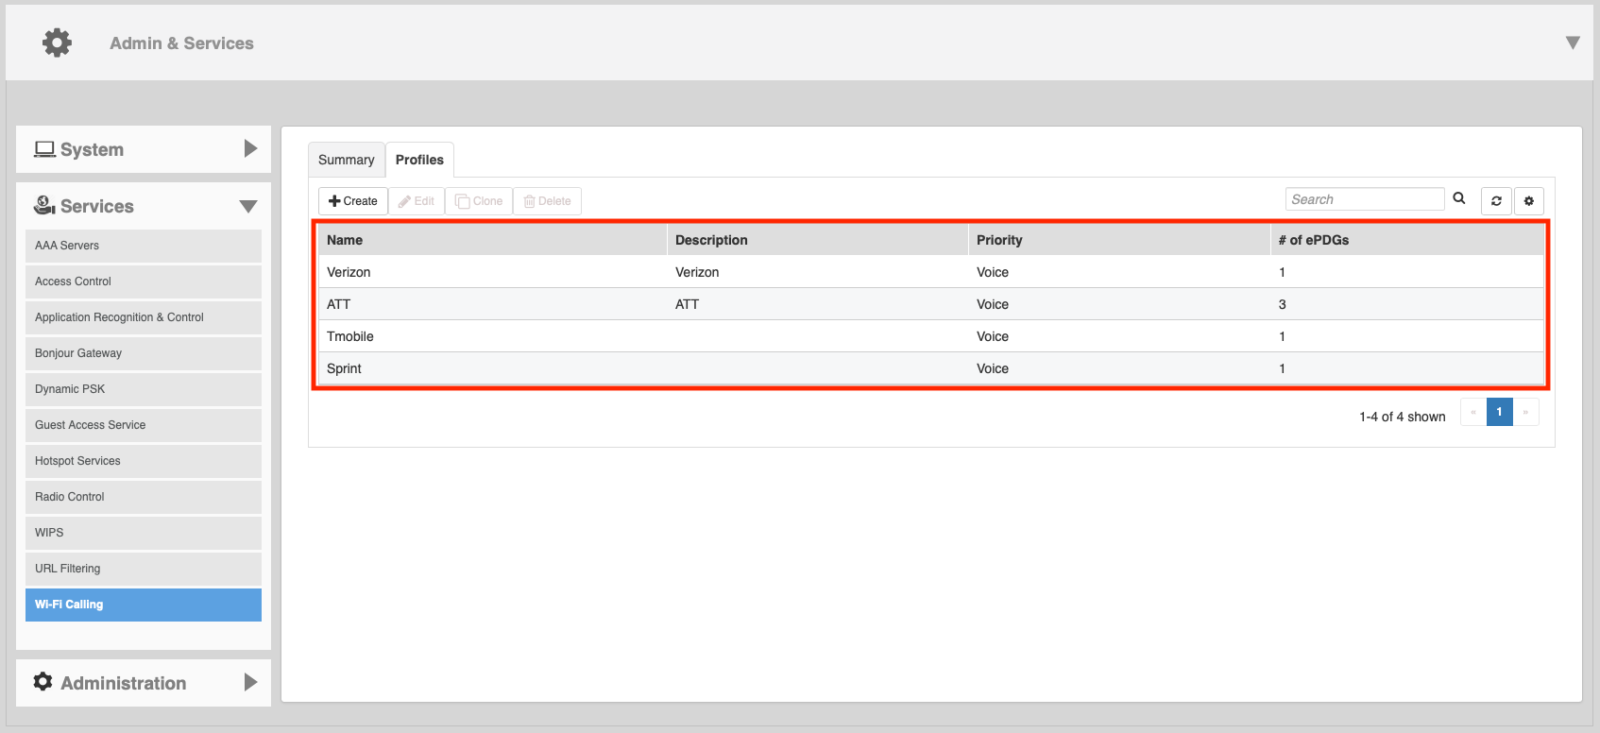
You can now see the profiles on the right side
Click OK to close the window
You can now see the profiles on the page
Click OK
Congratulations you are done!!
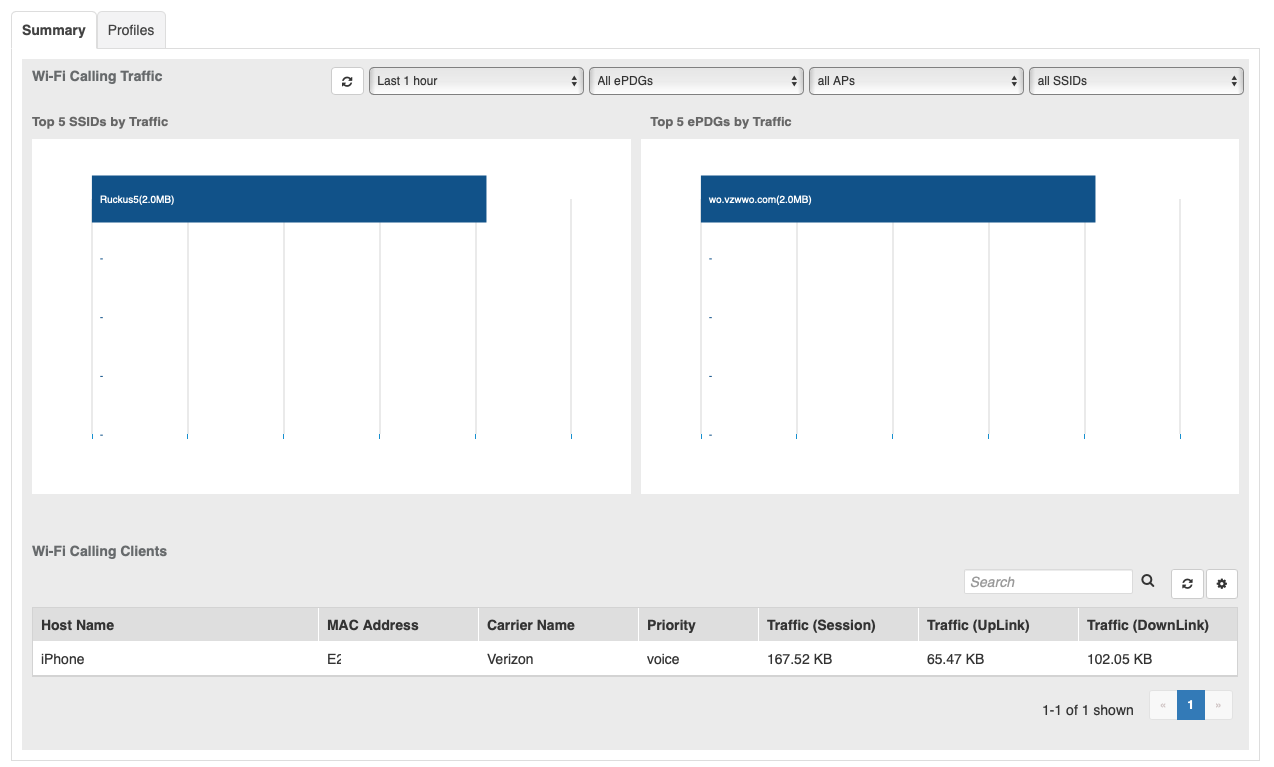
Head back over to Admin & Services – Services – Wi-fi Calling
You will now see a Summary page. When ever devices are using Wifi calling or have used it you will see information in here.
NOTE: You will not instantly see devices show up here. That does not mean Wi-Fi calling is not working.
You have completed all of the recommended steps for an amazing wifi system. You can now plug n the rest of your access points. They will take a few minutes to boot up and join the Unleashed system. You can monitor them from the Access Points menu section of the Unleashed dashboard.
Note: Depending on the POE switch you are using you may run into an Orange Triangle. If this does not go away after 5 minutes please use the button below to modify POE settings on the APs.
There are 4 major common issues that can prevent WiFi calling from being possible at all on your local network. We have listed the 4 Common Causes along with Solutions below
Important Note: while the Ruckus Wifi Calling options should always be enabled, this setup on its own does not enable wifi calling. This setup allows a device to transition from a wifi network to a cellular network and visa-versa, without any drops or interruptions. It is important to understand that if you can not even initiate a WiFi call, it is not the Ruckus system that is failing.
Cause: Your ISP modem/router is not in bridge mode.
Solution: The VPN encapsulation of your wifi calling packets are being broken by your double-NAT traversal across two local routers. To fix this, put your ISP modem/router into true bridge mode. If this is not possible (ie Verizon Fios), use a DMZ. This setup will vary by ISP and you will need to do your own research
Cause: Your LAN Router does not have the correct settings enabled.
Solution: If your local LAN Router is not setup correctly, this can also break the vpn packet encapsulation of a wifi calling tunnel, and you will not be able to place or maintain a wifi call. To fix this, research the correct settings for your make and model of router and enable them. The Netgate PFSense and Firewalla routers sold by Blackwire do not need any additional configuration for wifi calling to be successful.
Araknis Router Note: Go to Settings – Firewall and enabled IPSec Passthrough and SIP ALG.
Cause: Your phone does not have WiFi Calling enabled correctly.
Solution: Research the best WiFi Calling settings for your phone.. Enable WiFi Calling on your phone, and optimize any and all recommended WiFi Calling settings for your device, carrier, and area. This has become less specific over the past few years, and most devices’ default settings should work fine.
Cause: Your phone’s gps location is not accurate for reasons beyond your control and the FCC will not let you make a call because of this.
Solution: The most common example is that you have a wireless ISP in a rural area who leasing Public IPs from a larger provider like Comcast, in a local routing/switching office that is different than your true physical location. You may or may not be able to fix this. The first solution is to put GPS locations into your local network equipment. Also, contact your ISP and ask them to assist you with fixing your Local Network and Phone’s gps locations
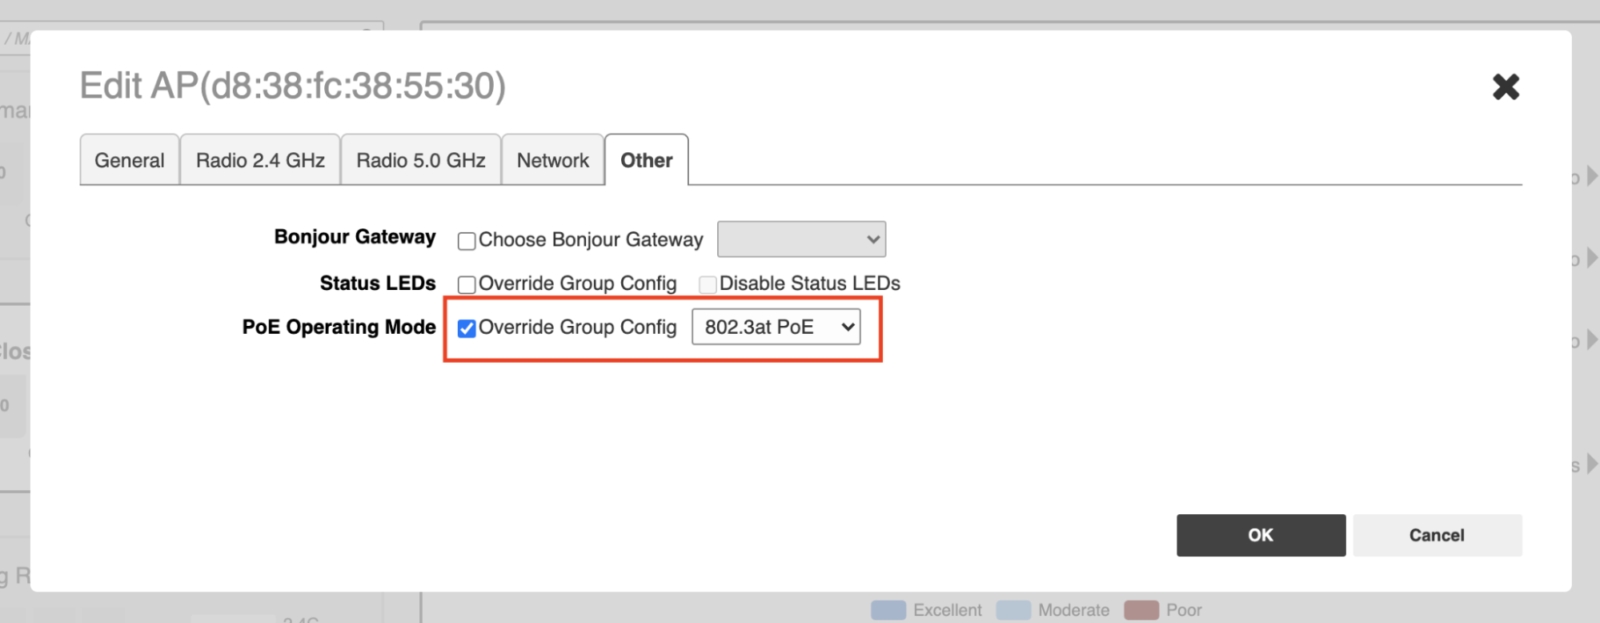
If you see some orange icons show up in the Unleashed Dashboard Access Points section, you have a Power Over Ethernet Error. Blackwire recommends using Ruckus ICX PoE Switches because they offer the best possible performance for the money and also integrate seamlessly into the Unleashed Dashboard.
Network Switches from other vendors might cause errors negotiating LLDP and the correct PoE requirements for devices. When this happens, we must manually override the PoE settings for our APs to have the best possible performance.
Warning: It is important to confirm your switch has a large enough POE budget before moving forward. Manually overriding automatic PoE settings on an Access Point or a Switch can damage your equipment if you are not careful. Blackwire recommends designing your network to only use 75% of the available Switch Ports and PoE to allow for growth, scalability, and resiliency.
Blackwire recommends using Ruckus POE switches as they offer the best performance for the money and integrate into the Unleashed dashboard for a unified management interface.

To manually override the PoE settings on an Unleashed Access point:
Note the T750 and R850 require POE++ 802.3bt7
Note: Depending on the Access Points you choose, different models of Ruckus APs can run at 15 watt PoE, 30 watt Poe+, and 60 watt PoH. Make sure you understand these requirements before designing, purchasing, deploying, or taking over a Network Switch or PoE Injector.
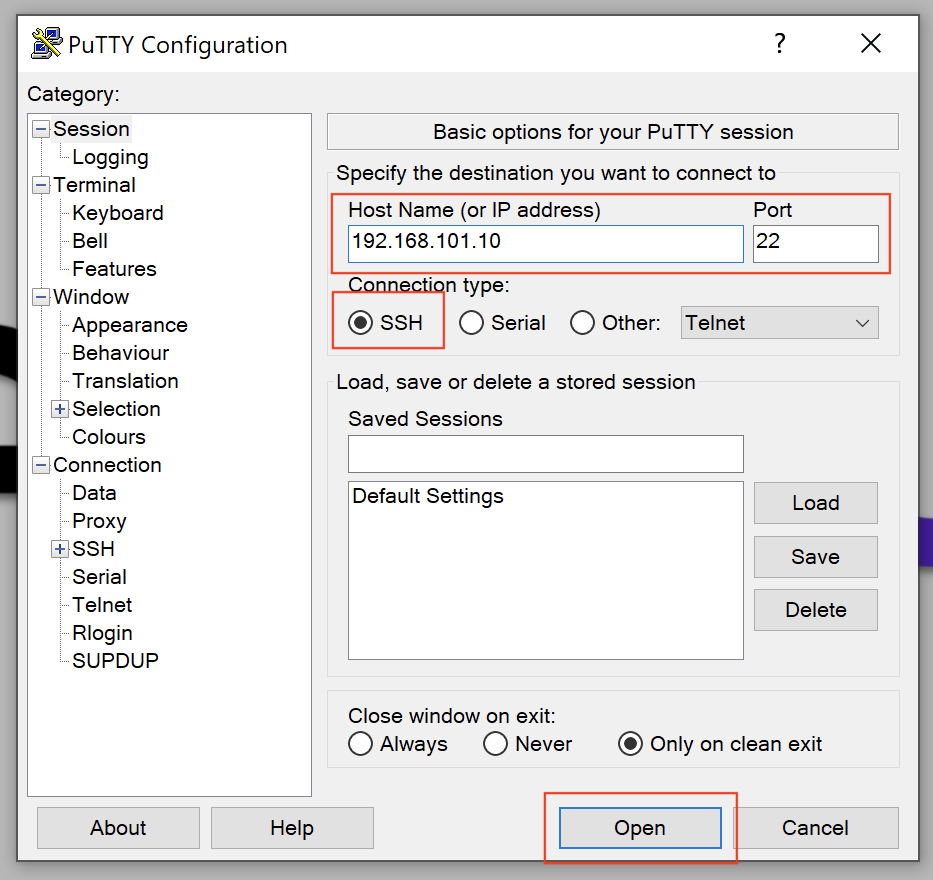
There are a few options for further optimizing your 5 GHz network in Ruckus Unleashed via the Command Line. To execute these commands, you will need the Putty application for Windows or the Terminal application built into Mac OS, as well as the skills and experience to open and connect via SSH. You will also want to make sure you do not have any gaps in coverage between zones of your WiFi Network before you run these commands: there is no command line magic trick to fix the need for an additional AP to fill those gaps in coverage.
*This guide does not include instructions for establishing an SSH or Console connection in Putty or the Mac OS terminal app. If you do not have this experience, you will want to spend a few hours in the office or at home becoming proficient with Putty and/or Terminal before attempting this on a customer’s live network. Troubleshooting your SSH or Console connection is not supported by Blackwire Designs*
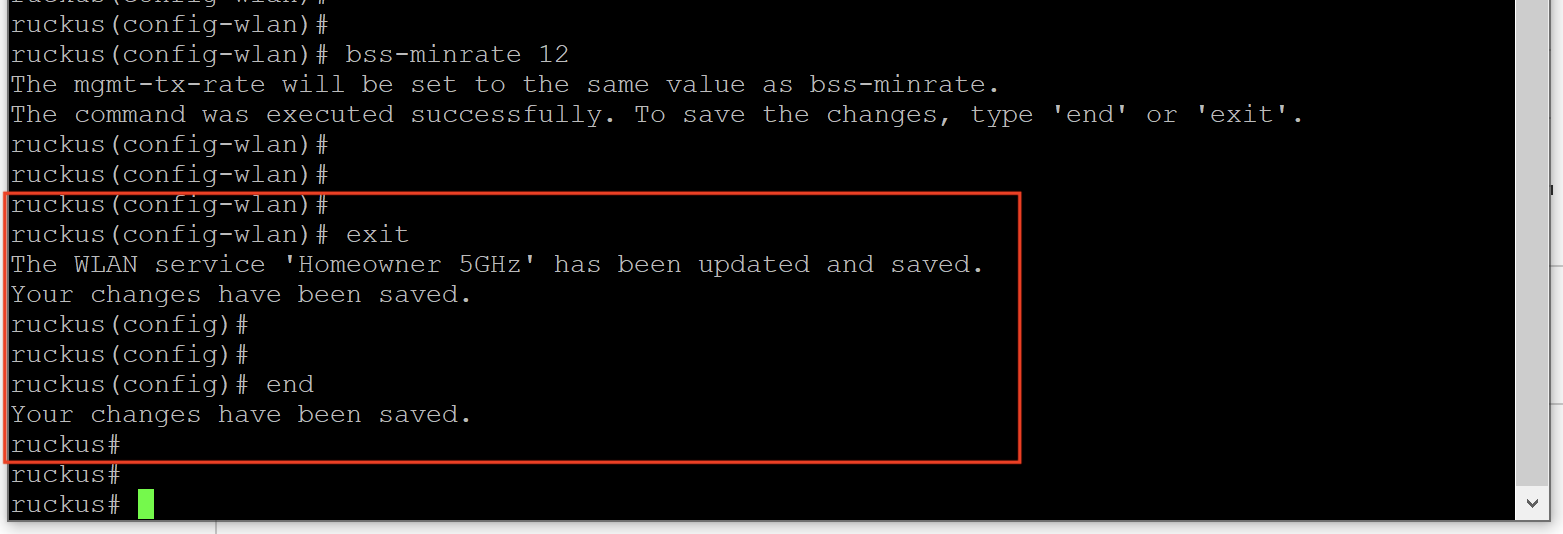
Here are the simple instructions for running these commands. If you want a more detailed explanation as to how why this helps your 5 GHz WLANs, you will find that further down on this page:
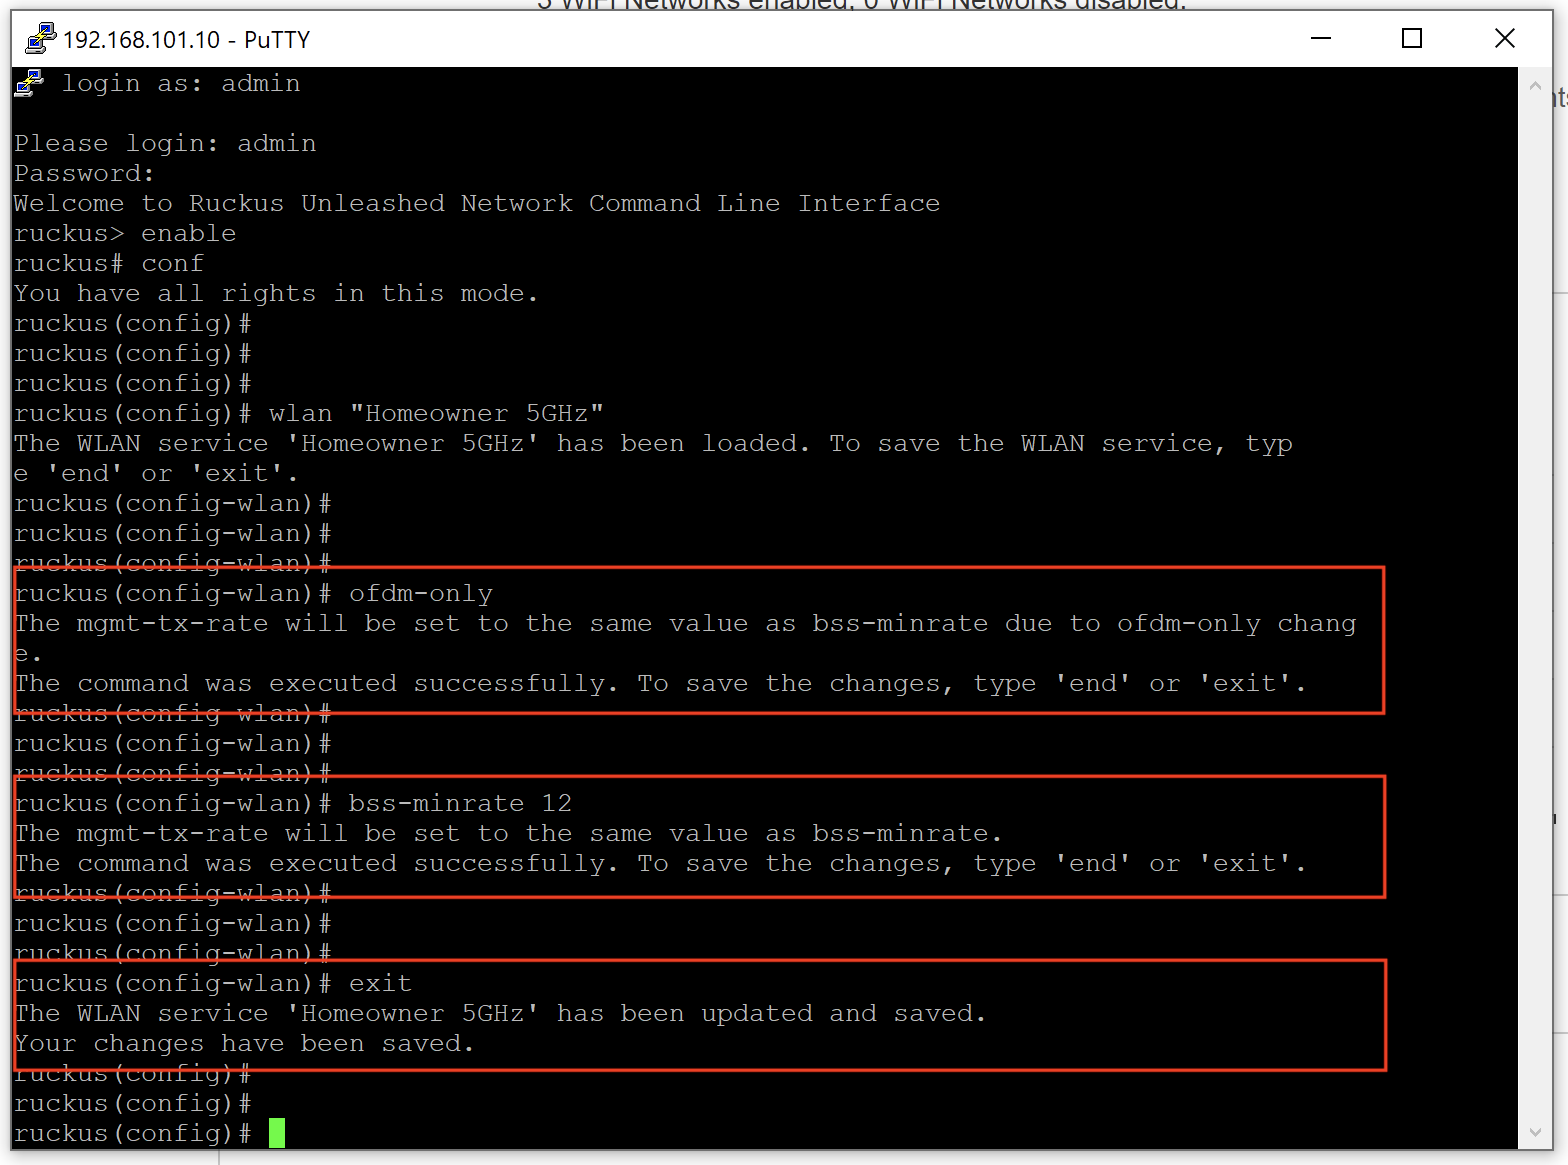
How and Why these Commands Help with 5 GHz Performance:
A Smart Home network is a dynamic entity: your customers have the password to their own wifi network and they will add and remove devices. Hence, the workload and performance of that network will change over time. For this reason alone, we will run the ofdm-only command on our 5 GHz networks to prohibit any device or network traffic other than 802.11ac and 802.11ax (WiFi-6) from being allowed on our network. This will ensure that all contention for the WiFi radio medium is as fast and efficient as possible.
The effect of this setting is improved performance for applications with a high demand for Airtime and UDP services: WiFi Calling, FaceTime, Zoom, and streaming video over Apple TVs, Roku’s, and Video Doorbells. Once these commands are in place, the customers will not be able to join a legacy device to this WLAN even if they try to.
*Be cautious however: once you run this command, any legacy device will be forcefully removed from this network. Make sure you take account for all devices, and if there are any legacy devices that still need WiFi, either replace them with a more modern device or join them to your 2.4 GHz Only WiFi Network. If your customer has legacy devices but complains about poor WiFi Calling and Zoom Calls, tell them that they can’t have it both ways! They need to add AP’s to fix gaps, or upgrade those legacy devices, or connect them to a 2.4 only network!*
How and Why these Commands help with Seamless Roaming:
Because it is ultimately the wireless client device (not the Ruckus Unleashed System) that decides when and how it roams from one AP to another, we are not always in full control of when or how roaming takes place. Because of this, we can improve the frequency and chances of successful, fast, seamless roaming by disabling the lowest data rates on our 5 GHz WLANs. This is accomplished via the bss-minrate 12 command.
By executing this command: if a device moves away from an AP, once it reaches a data rate below 12 Mbps, it will be forcefully disconnected from the WiFi Network. If your customer goes to walk their dog, and they remain connected to their WiFi network from 500′ down the block, they probably are not using the wifi network. Regardless, if they remain connected, this will result in dropped packets, retransmissions, and poor performance for other devices on that WLAN.
Additionally, if you have ever had the experience that “this device is 10 feet away from the Living Room AP, but it is still connected to the Laundry Room AP 100 feet away”, this command will fix almost all of these issues. Usually, this is because a “smart” device had a temporary issue with an AP or SSID and has decided to blacklist it so that it can stay connected to the cloud. Setting the minimum data rate to 12 Mbps, rebooting your network, and rebooting that device will fix this in 99% of all scenarios.
*Be cautious: If you have gaps in your wifi coverage, you might have a reason to leave your 2.4 and 5 GHz networks combined to help fill in these gaps. If this is the case, you should skip running these commands while you figure out how to run another wire or add a mesh AP to fix those gaps. Combining 2.4 and 5 GHz networks, or leaving gaps in coverage is not ideal. And there is no command-line magic trick to substitute for adding another necessary AP to your network.*
Some other important considerations for optimizing your 5 GHz network:
Starting Feb 1, 2023 we have removed our recommendation to change the Country Code to the Optimize for Performance. Below is an explanation of the two different modes. Our default recommendation is now to keep the system in Optimize for Compatibility mode.
Optimize for Compatibility:
Optimized compatibility mode is used in a standard installation or where there is heavy plane traffic overhead/nearby such as by an airport. This mode restricts the Channels that 5Ghz can use but will not impact performance in this channel space.
This mode should be implemented for standard installations or especially when interfering radar is nearby. They will be utilizing the DFS channels that are broadcasted in the 5Ghz range and will drop your connection forcefully as they get priority channel space.
Optimize for Performance:
Optimized for Performance mode is used so all DFS and non-DFS channels, without regard for compatibility or interoperability are available. This mode will not restrict the available channels for 5Ghz.
This is implemented when you have a lot of APs with no nearby regular interfering radar. It provides all channels so you can reduce the amount of channel overlapping which can decrease performance. This only becomes an issue if there is significant overlap with multiple APs near each other.
Distance from an Airport:
Distance is variable. There is no set distance to the radar broadcasting in the DFS channels. You can check to see if the issue is occurring by reviewing the logs in the controller. After 30 days if there are no significant drops in 5Ghz on DFS channels then you are fine.
Click here to register an account
Registration is easy and should only take a minute to fill out the form.